Release Guide
This document describes how to perform a Headlamp release.
The idea is that we list the steps here as a guide and automate it along the way, so the number of steps is reduced as much as possible in the future.
Version bumping
We follow the semantic versioning guide.
Steps to perform a Headlamp release
When ready to perform a release (changes worth releasing since last time is done, QA is done), then:
1. Create a new branch
Create a new branch called "rc-X.Y.Z" where X.Y.Z is the new release version.
2. Bump the app “version”
If using the automated Headlamp Releaser tool (recommended), run the start command to automate version bumping, dependency installations, Helm template regeneration, and committing:
# Navigate to the releaser directory, install deps, build/link it, and start the release
cd tools/releaser
npm install
npm run build && npm link
releaser start X.Y.Z
This will automatically commit the changes with the message:
releaser: bump version to X.Y.Z
If performing the version bump manually instead:
On the release branch, bump the “version” field in app/package.json, run npm install inside app/ (and update Helm Chart version/templates if applicable), then stage and commit the changes with:
git add app/package.json app/package-lock.json charts/headlamp/Chart.yaml charts/headlamp/tests/expected_templates
git commit --signoff -m "releaser: bump version to X.Y.Z"
Bug fix: make a branch off the tag, and cherry pick everything in. Or make a branch off main and remove merge commits compared to previous tag (On the branch to remove merge commits, do: "git rebase main").
git log v0.25.0.. --oneline
3. Start a release draft
Start a release draft by manually running the "Create release draft" action (it's important to give it the right release name as it creates links with that number in the draft):
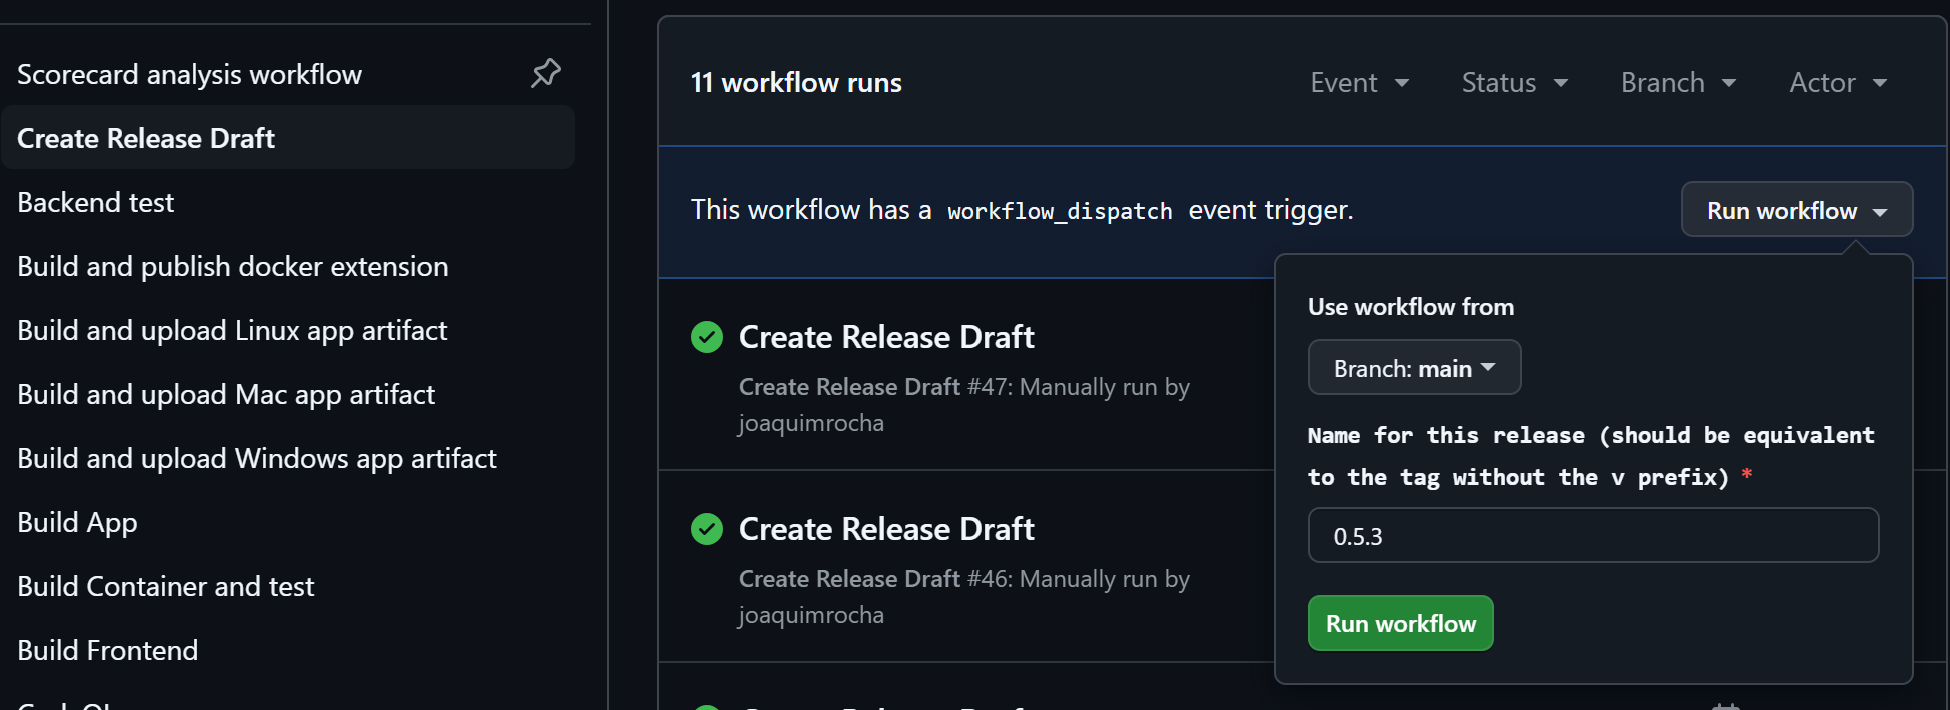
4. Check the list of changes since the last release
Check the list of changes since the last release:
git log \`git describe \--abbrev=0\`..
Then go to the release draft created in the previous step and fill it accordingly.
Look at previous releases. Write for humans: no context part, like "frontend:". Put github user name in "(thanks @XXX )" at end of line for external contributors.
5. App signing
The build scripts handle app signing.
6. Generate Apps
Generate the apps for each the Linux, Windows, and Mac platforms by running the "Build and upload PLATFORM artifact" actions against the "rc-X.Y.Z".
Use releaser ci app --build rc-X.Y.Z, or select rc-X.Y.Z both under Use
workflow from and as the build branch. The workflows only generate the build
provenance for the apps when they run from the branch they build, and the
assets can't be uploaded to the release without it (see step 8).
7. Download and test Artifacts
Download the artifacts, test them and, if everything goes well, upload them to the new release's assets area.
8. Push Assets
Upload the assets to the release by running the Upload Release Assets
workflow (.github/workflows/push-release-assets.yml) from the GitHub Actions
UI. Run it from the main branch, not the release branch: users verify the
signature against the workflow on main, so the workflow refuses to run from
any other branch. Give it the release name (e.g. 0.42.0) and the comma-separated run IDs of
the "Build and upload PLATFORM artifact" workflows from step 6. You can list
those runs with releaser ci app --list.
The workflow uploads the assets, updates checksums.txt, and signs it with
cosign keyless signing. It uploads the signature as checksums.txt.sigstore.json.
It also combines the build provenance from the app build runs into
headlamp-X.Y.Z.intoto.jsonl and uploads it. Uploads to the same release are
serialized so partial uploads preserve each other's provenance. Before uploading,
the workflow checks retained assets against their actual bytes and fails if any
are missing from checksums.txt or have a different digest. To repair an
incomplete manifest after a failed upload, rerun with the build run IDs for all
affected assets so they are replaced and their checksums restored.
Release API or retained-asset download failures stop the workflow before uploading.
The workflow also fails if an asset in checksums.txt has no verified build
provenance, or if the signature or provenance is not attached to the release. Users rely on these to
verify downloads (see Verifying Releases),
so always use the workflow, and make sure it succeeded before publishing the
release. releaser check X.Y.Z also reports a missing signature or provenance
(see step 9).
Do not upload assets manually with app/scripts/push-release-assets/push-release-assets.js,
because that skips signing. If you need to add or replace an asset, re-run the
workflow with the run ID of the build that produced it (set force if the
release is no longer a draft), so that checksums.txt is signed again.
The workflow uses GitHub's short-lived automatic token with contents: write
permission to update the release. It does not require a long-lived personal
access token or repository secret. A branch run can test a real upload to the
requested draft release by enabling Allow non-main; force uploads remain
blocked outside main. Always rerun the workflow from main before publishing
so checksums.txt receives the trusted Sigstore identity.
9. Push the new tag
Go to the main branch and merge the rc-X.Y.Z in, then create a signed tag
(notice the v before the version number). Use releaser tag, which signs
the tag by default, or:
git tag -s vX.Y.Z -m "Release X.Y.Z"
Make sure your GPG or SSH signing key is
added to your GitHub account
as a signing key, so that the tag shows as Verified. releaser publish
refuses to push an unsigned tag, and doesn't publish the release if GitHub
reports the pushed tag's signature as invalid. It only warns if GitHub can't
match the signing key to your GitHub account. You can also check the tag
yourself: look for the Verified label on the
tags page, or run
git tag -v vX.Y.Z (see Verifying Releases).
Push the signed tag before publishing the release draft, either with
releaser publish or with the commands below. If the draft is published while
the tag doesn't exist yet, GitHub creates an unsigned, lightweight tag from the
latest commit on main. That commit may not be the release commit (this
happened with v0.44.0).
Push the new release commit and tags:
Note: DO NOT RUN THIS BELOW EXCEPT ON NEW FEATURE RELEASES.
git checkout main

git merge rc-X.Y.X \# (this should NOT create a merge commit since the bump commit is the only difference)

git push origin main

git push \--tags
Then publish the release with releaser publish X.Y.Z, which checks that the
tag is signed, attaches it to the draft, and publishes the draft. If you publish
the draft from the GitHub UI instead, select the existing vX.Y.Z tag.
However you uploaded the assets, created the tag, or published the release, run
releaser check X.Y.Z before publishing and again afterwards. It fails if the
checksums.txt signature or the provenance is missing, or if the tag is not
signed or its signature is invalid, e.g. because it was made with an expired
key. It warns if GitHub can't match the signing key to the tagger's GitHub
account, or couldn't check the signature at the moment.
10. Container images and distribution channels (flathub, homebrew)
Container images are built automatically on every tag creation, pushed to the GitHub Container Registry (ghcr.io), and signed with cosign.
Other distribution channels like flathub, homebrew, minikube, will be done by automatically opened PRs.
11. Announce on social media
Ask someone in the social team (Joaquim or Chris) to toot/tweet/post about it from the social media accounts.